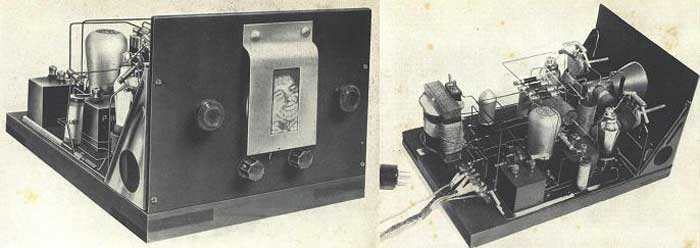
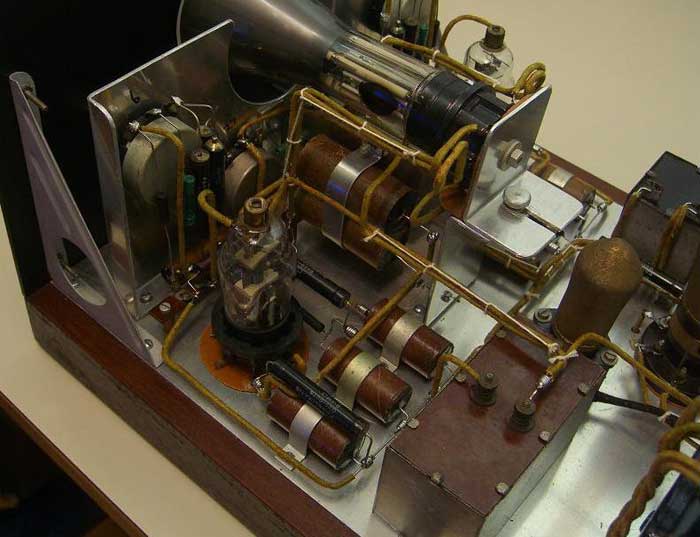
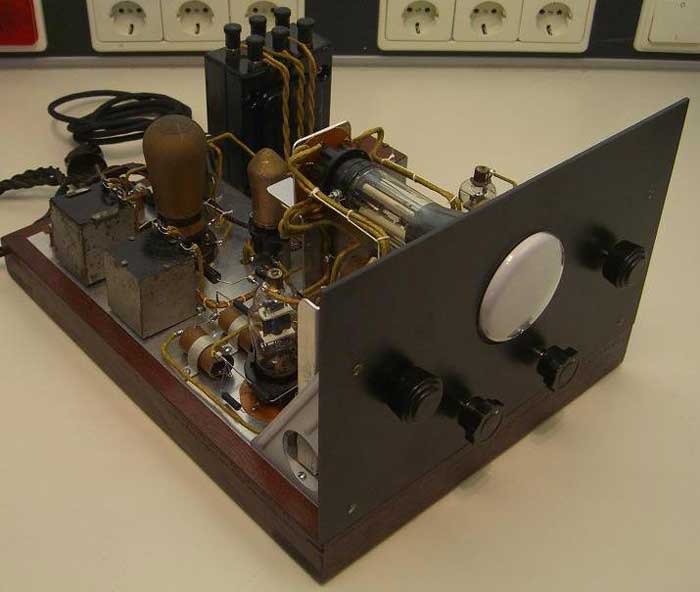
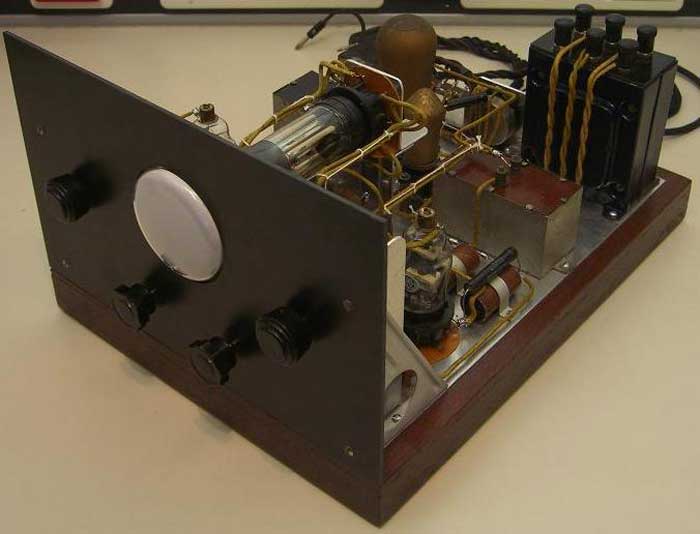
Early Electronic Television Television Receiver MonitorBy Roland Huismann Note: the original text is in Dutch, which is included below, along with the Google translation into English, which is diffficult to understand. A better translation will be posted soon. Nou hehe, daar is hij dan eindelijk. Tussen het werken en schilderen van het huis door is er toch nog wat knutseltijd geweest. In navolging op mijn Kerkhof televisie voeding is nu ook mijn zogeheten beeldcombinator klaar. Tegenwoordig heeft zoiets de naam monitor. Ik wil in vogelvlucht laten zien wat het inhoud om zo'n monitor te maken. Daarbij wil ik vooral laten zien dat je als zogeheten "keukentafel amateur" best heel aardige resultaten kunt bereiken. Allereerst hebben we voor de beeldcombinator de minste beschrijvingen in het boek staan. Er zijn twee foto's, een schetsje met een paar component plaatsingen als voorstel én het schema. Verder zijn er geen afmetingen of wat dan ook opgegeven. Het is dan ook aan je eigen creativiteit. ******* Hehe Well, here it is finally. Between work and painting of the house there is still some time been tinkering. Following on my television diet Cemetery is also known as my beeldcombinator ready. Today is something called monitor. I want to show at a glance what the contents to make such a monitor. In addition, I especially like to show you that so-called "kitchen table Amateur" best can achieve very nice results. First are the least of beeldcombinator descriptions in the book. There are two photographs, a sketch with a few component placement as a proposal and schedule. Furthermore, no dimensions or whatever specified. It is your own creativity.
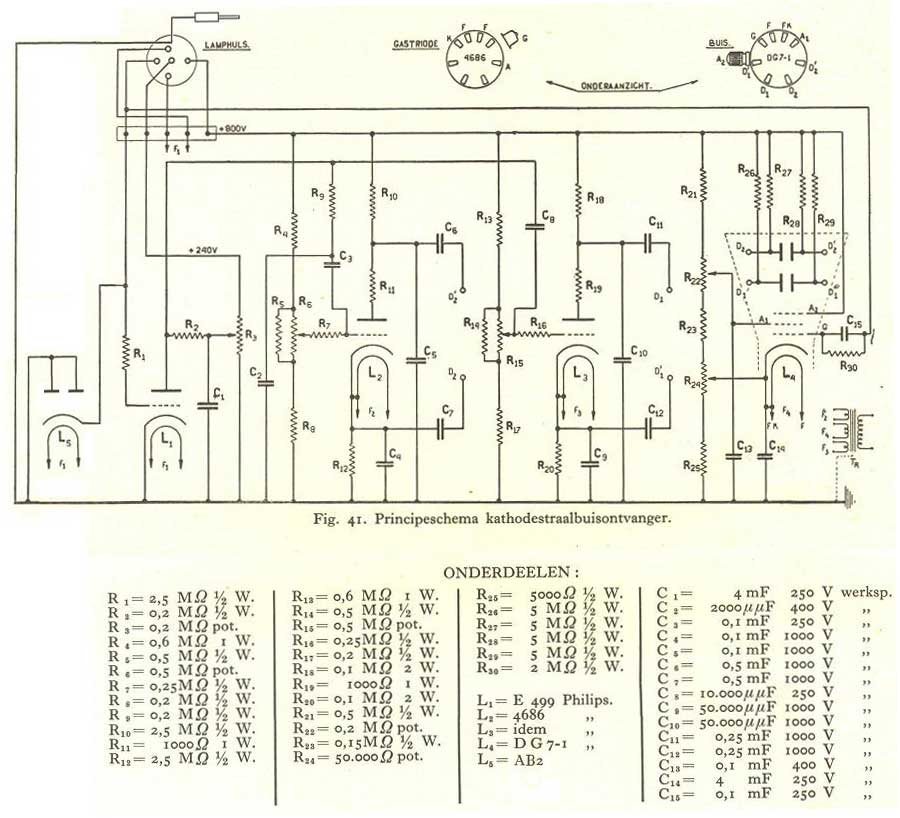
Het schema hieronder is aangepast door mij. Op de foto is een AB2 te zien welke niet in het schema stond. De buis werd als diodebuis in de tekst genoemd. En zoals Theo eerder opmerkte, men heeft de massadraad geen aansluiting gegeven. Daar is nu een lampvoet met zijcontact voor gekozen. ********** The diagram below is modified by me. In the photo is a AB2 to see what was not in the schedule. The tube has a tube diode mentioned in the text. Theo And as noted earlier, one has no ground wire connection data. There is now a base with third prong is chosen.
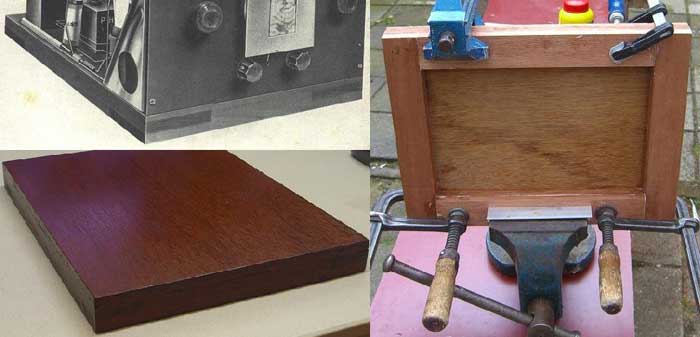
Laten we bij de bodemplaat beginnen. Deze bestaat uit een aantal plankjes die op de hoeken over elkaar heen liggen. Daaroverheen ligt een multiplex plankje. Zaag de hardhouten latjes met een ijzerzaag! Daarmee krijg je een zeer glad oppervlak op de kopse kanten. Ik heb als breedte de afmeting van de voeding (29cm) genomen. De diepte (38cm) heb ik bepaald door wat te schuiven met componenten. Verder rest dan met multiplexplaatje welke je geheel verlijmd met latjes. ******** Let's start at the base. It consists of a number boards at the corners across each other. Over it is a plywood board. Saw the hardwood slats with a hacksaw! So you get a very smooth surface on the ends. I like the width size of the food (29cm) taken. The depth (38cm), I determined to push through with what components. Rest than continue with plywood plate which you totally glued slats.
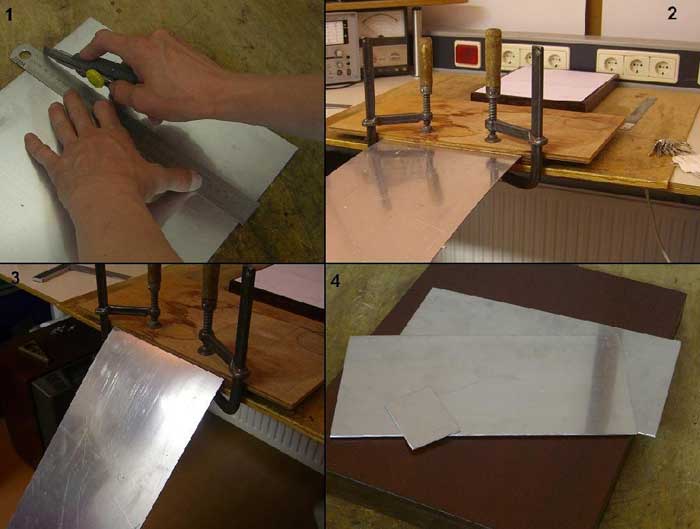
Metaalbewerking... Nou ja, Aluminium. Door de jaren heen heb ik aardig wat afgeknutseld. Om aluminium strak op maat te krijgen heb ik mezelf een trucje aangeleerd wat ik graag wil delen. Teken het aluminium af en snijd dan met een hobbymes een gleufje in het aluminium. (Ja dat kan, het is zacht spul. Maar gebruik het liefst een stuk hoekprofiel om langs te snijden. Dan kom je je vingers niet tegen als je uitschiet.) Klem het vervolgens tussen twee planken in op een bureau wat stevig staat. De snijrand ligt dan precies op de rand van die planken. Haal nu het aluminium rustig heen en weer, je zal zien dat het aluminium steeds makkelijker heen en weer gaat en scheurt. Haal er even een vijltje of schuurpapiertje langs en het resultaat is verbluffend strak! ******* Metalworking ... Well, Aluminum. Over the years I have afgeknutseld quite a bit. To tailor to get tight aluminum I taught myself a little trick I would like to share. Sign the aluminum and cut it with a knife a notch in aluminum. Yes you can, it's soft stuff. But use the preferably a piece of angle section to be cut down. Then you get your fingers if you're not against slips.) Clamp the two boards then to what a desk footing. The cutting edge is exactly on the edge of the boards. Now take the aluminum back and calm, you will see that the aluminum goes back and forth more easily and tear. Take it as a small file or sandpaper along and the result is quite tight!
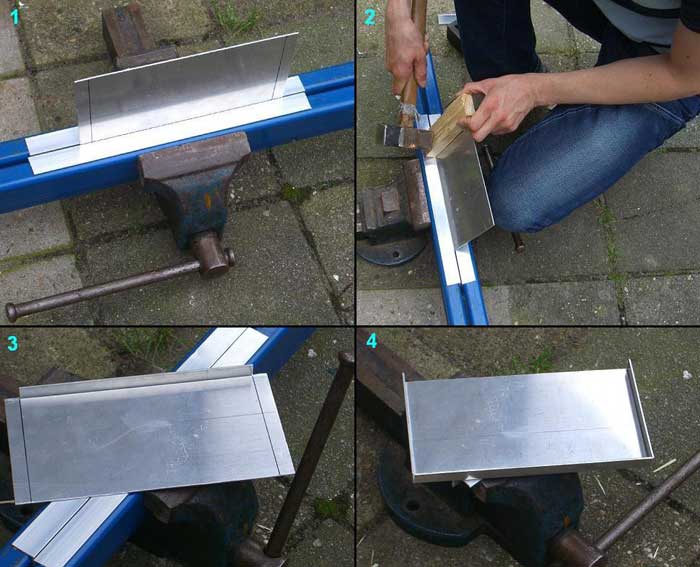
Met vlakke plaatjes hebben we nog geen chassis natuurlijk, buigen is de volgende stap. Voor de staande delen is aluminium met een dikte van 2mm gebruikt. Om dit mooi strak te buigen komen we op ouderwets bankwerken uit. Daar de frontplaat breder is dan de gemiddelde bankschroef plaatsen we twee metalen staven oid tussen de bekken. Hier overheen liggen twee getrokken aluminium hoekprofieltjes. Die leveren de strakke hoek voor ons werkstuk. Klop nu met een kleine moker en een blokje hout het aluminium stukje voor stukje om. Neem de tijd, leg het blokje telkens een stukje verder, totdat de haakse hoek bereikt is. ********* With flat plates, we have no frame of course, bow is the next step. For the live parts is aluminum with a thickness of 2mm is used. To nice and tight bend we reach old Bank works. As the front plate is wider than the average vice we place two metal rods or the like between the jaws. There are over two extruded aluminum perimeter trim little. Which deliver the tight corner work for us. Now tap with a hammer and a small piece of wood to aluminum piece by piece to. Take your time, put the block each time a little farther, until the right angle is reached.
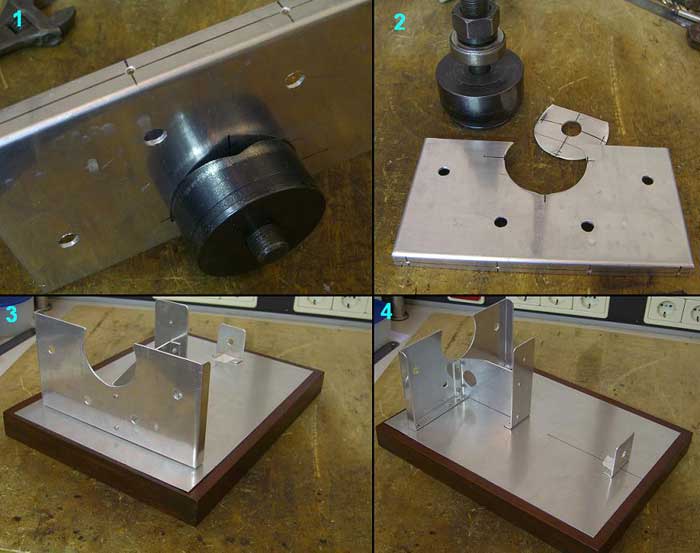
Om het beeldbuisje voor de frontplaat te laten komen moet er een vrij groot gat in. Nu had ik de mazzel dat ik van mijn werk een trekpons kon lenen. Verder wat boor en knutselwerk en de basisvorm komt naar boven. ****** To complete the picture tube of the front panel to come to a fairly big hole. Now I had the good fortune of my work that I could borrow a popular punch. Further drilling and some tinkering, and the basic form emerges.
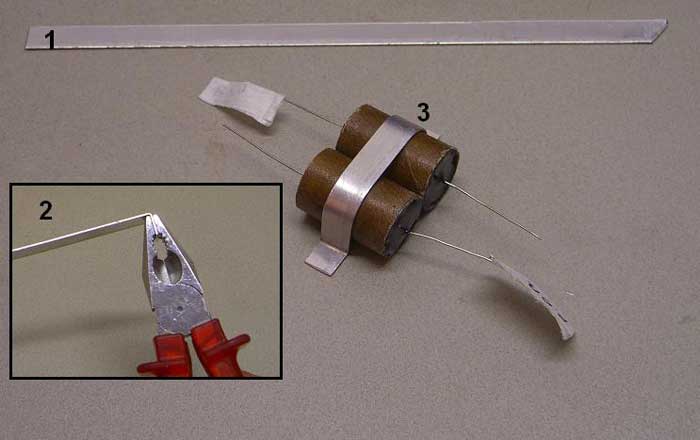
De onderliggende plaat is een 1mm aluminium plaat. Van een strookje zijn hier prima condensatorbeugels van te maken. ****** The underlying plate is a 1mm aluminum plate. Of a strip are excellent condenser brackets to make.
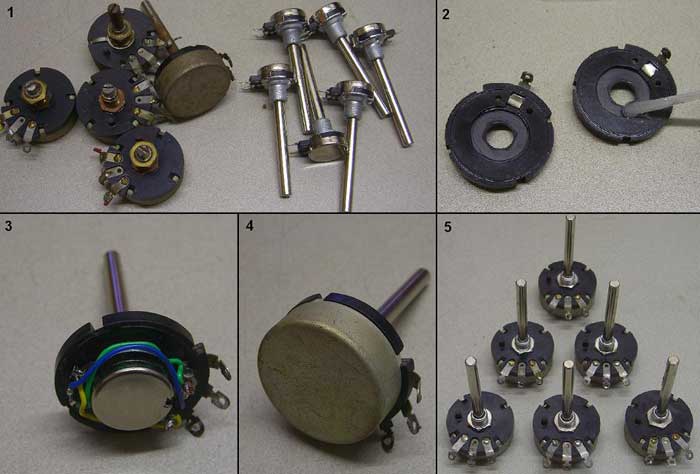
En dan nu wat meer elektronisch gerichte arbeid. Op het toestel zitten een vijftal potmeters. e potmeters die ik had waren of erg versleten of hadden een sterk verlopen waarde. Uit wat chassis heb ik wel een aantal dezelfde exemplaren kunnen halen. Van Ben Dijkman kreeg ik er ook een paar in dat model. Deze hebben een nieuw binnenwerkje gekregen. ****** And now some more electronic-oriented work. On the device are five potentiometers. The potentiometers I had or were very worn and had a strong run value. From what I have a chassis number of copies the same targets. Ben Dijkman I got a few in that model. These have a newly acquired drawing inside.
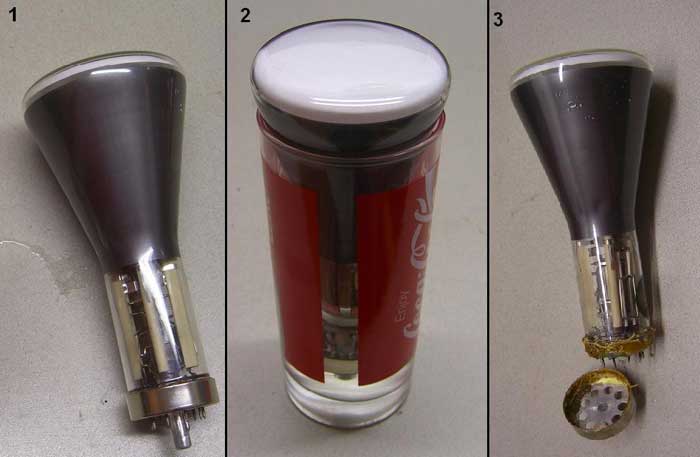
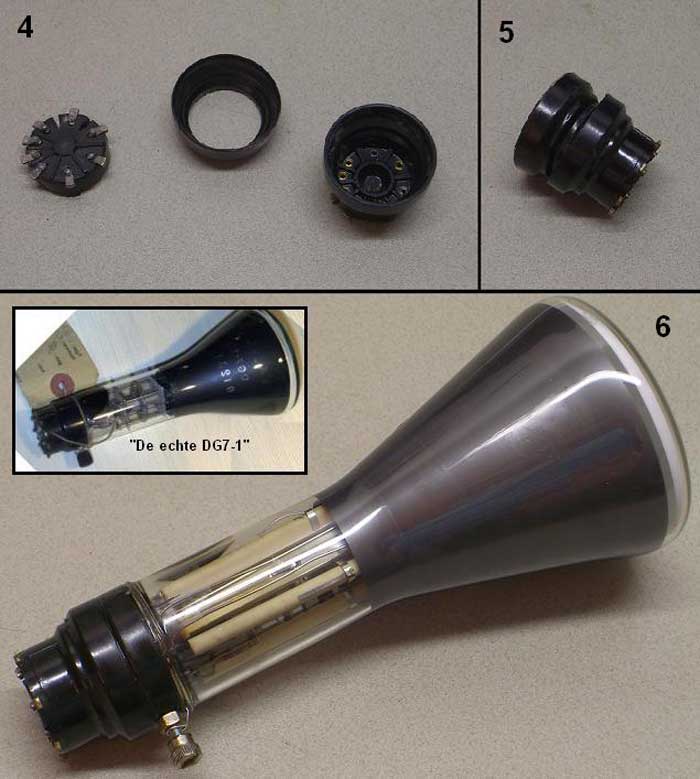
De voorgeschreven DG7-1 beeldbuis lijkt een lastig verkrijgbaar buisje te zijn geworden. Net als Theo okkinga en Ben Koks heb ik ook een DG7-6 omgetoverd. Ben gaf mij de tip om de buis een dag in de alcohol te zetten, dan lost de lijm op. En jawel... ****** DG7-1 laid the tube seems hard to get a tube to be become. Like Theo and Ben Cooks okkinga I have a DG7-6 transformed. Ben gave me the tip to the tube in one day to put the alcohol, it dissolves the glue. And yes ...
De voet van de DG7-1 is een verlengde P-voet. Omdat ik geen draaibank heb kon ik geen verlengbus draaien. Ben Koks kon dit voor mij doen maar de agenda's liepen helaas niet synchroon. Dus ik heb het anders gedaan: Ik heb van een tweede P-voet het bovenste deel afgezaagd. Dit dient nu als verlengstuk en past uitstekend. ****** The foot of DG7-1-P is an extended foot. Because I have no lathe I was not able verlengbus run. Chef Ben could do this for me but The calendars were unfortunately out of sync. So I have done differently: I have half of the P-foot upper cut. This should Now as an extension and fits perfectly.
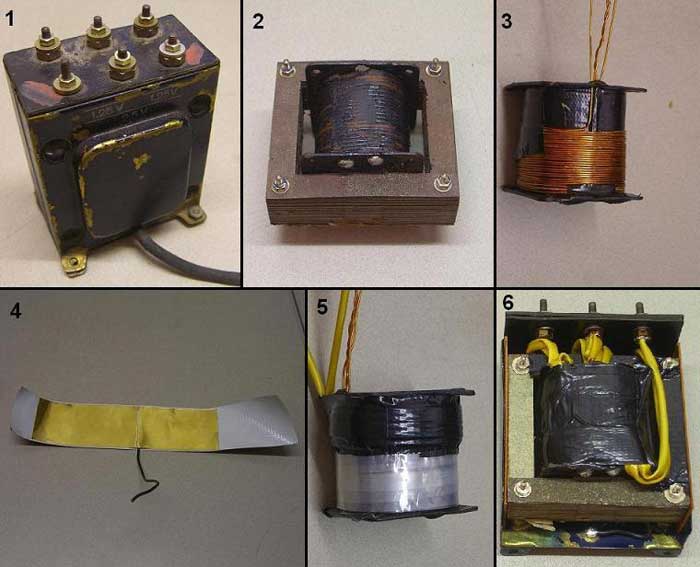
In het schema is rechts in de hoek een gloei-transformator te zien. Op de gloeiwikkelingen van de AC50 / 4686 buizen staan hoge spanningspieken doordat hier de zaagtandspanning voor de afbuigplaten op komt te staan. Van een stukje latoenkoper is een prima afscherming te maken. Let wel op dat het begin en eind elkaar niet kunnen raken. Dan ontstaat er namelijk een kortsluitwinding. Om verder een goede isolatie te krijgen is er isolatiemateriaal gebruikt wat om moderne ringkerntrafo's zit. De wikkelingen voor de twee AC50 buisjes zijn op een afstand van elkaar gewikkeld. ****** The diagram on the right corner to see a filament transformer. On the filament windings of the AC50 / 4686 tubes are high voltage spikes because here the sawtooth voltage on the deflector will be placed. This transformer must therefore good insulation requirements. It must also avoid that there is a mains hum transferred. Latoenkoper of a piece is an excellent shield it. Please note that the beginning and end of each can not touch. Because it creates a short circuit winding. To continue to get good insulation is insulation used to what is modern toroidal transformers. The windings of the two tubes AC50 at a distance from each wound.
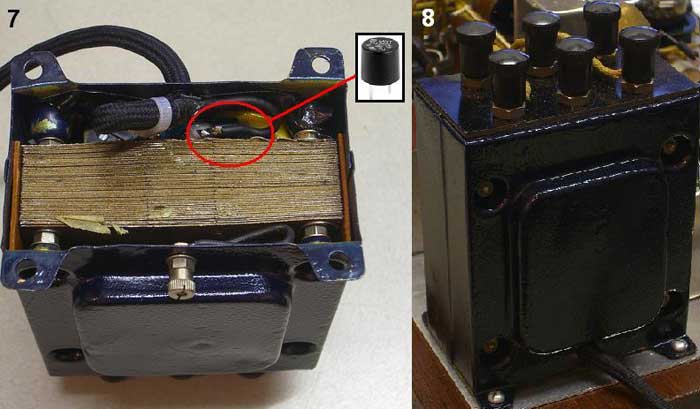
Om narigheid in de toekomst te voorkomen heb ik een kleine zekering in de onderkant van de trafo geplaatst. De gebruikte trafo was ook een bekende gloeitrafo van Philips. Hij was al beschadigd, en omdat de spanningen toch niet meer overeen komen is hij overgespoten. ****** To avoid future trouble, I have a small fuse in the bottom of the transformer installed. The transformer used was a familiar glow of Philips transformer. He had been damaged, and because the voltages do not match, he repainted.
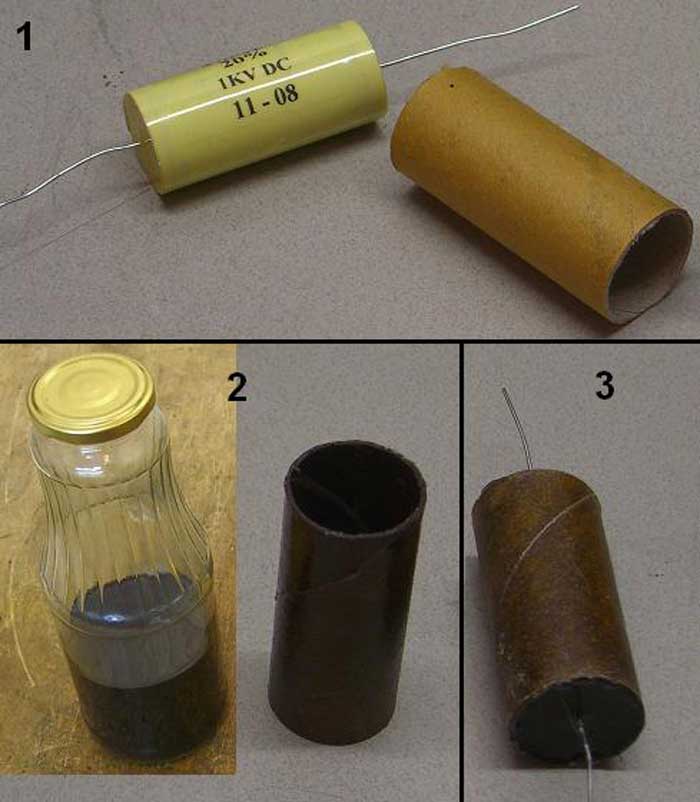
Omdat er aardig wat condensatoren inzitten van GROTE afmetingen had het weinig zin om in sloopradio's te gaan zoeken. Zelf maken is het devies. Bij de papierwinkel heb ik wat cadeaupapier gehaald. In de winkel: "Ah u heeft mooi cadeaupapier kunnen vinden zie ik?""Nou nee, ik heb wat kartonnen kokertjes nodig." Ik geloof dat de mevrouw in de winkel er nu nog over na aan het denken is want ze leest het forum hier vast niet... Van diverse kartonnen kokers heb ik maten gesneden die ik nodig had. Deze kokertjes heb ik op kleur gemaakt door ze een tijd in een pot politoer te laten hangen. Daarna zijn ze dichtgemaakt met een kartonnetje ****** Since there are quite a few capacitors occupants of large dimensions had is little point in breaking up radios to search. Yourself is the motto. In the paperwork I've met some wrapping paper. In the shop: "Oh you pretty wrapping paper to find I see?" "Well no, I have some cardboard tubes needed." I believe the lady in the shop is still on after the thinking as they read this forum probably not ... Cardboard tubes of various sizes, I cut I needed. These tubes of color, I made it through a time in a jar polish to hang. They were then sealed with a cardboard side then fill them with glue gun glue. This is then blackened. Black kit can also just.
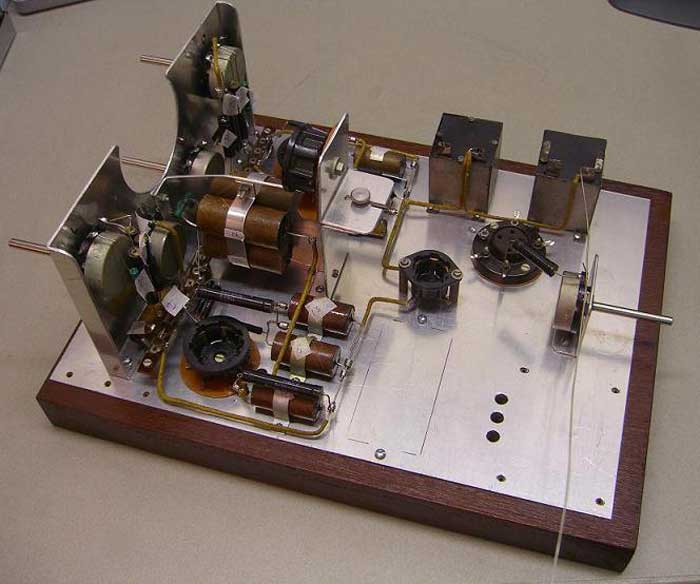
En dan nu... KNUTSELEN! Zodra je eenmaal alle componenten hebt gaat het snel. Vooraf is er goed over nagedacht hoe ik er alles op wil hebben. Op de meeste componenten zit een plakkertje met het componentnummer er op. Anders kom je er echt niet meer uit. ****** And now ... YOURSELF! Once you have all your components, it quickly. Advance is Consider how well everything I want. On most components is a sticker with the component number on it. Otherwise you really can not get out.
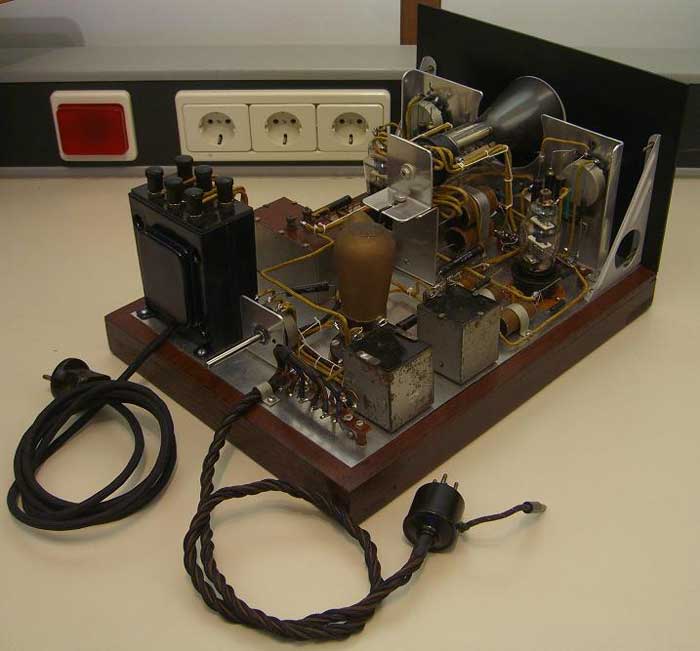
Ben Dijkman heeft voor mij die mooie onderstaande multi-kabel op specificatie in elkaar gezet. (De kabel die naar die lampvoet loopt) De spanningen zijn vrij hoog, dus ik wil er goed materiaal aan hebben. Dus alle bedrading is nieuw. ****** Ben Dijkman for me that these beautiful multi-cable specification to put together. (The cable that runs to the lamp base) The tensions are quite high, so I want to have good material. So all wiring is new.
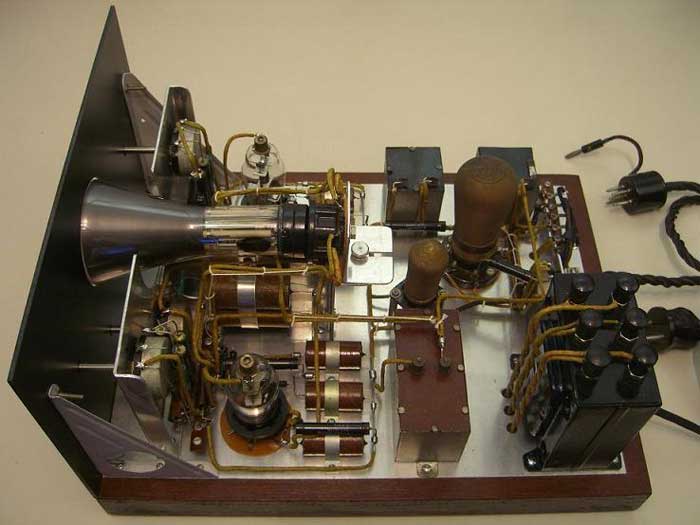
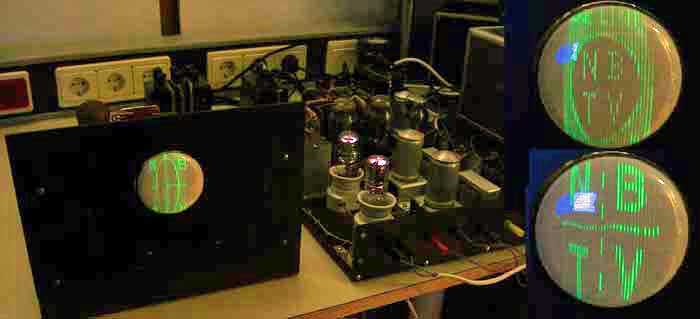
En dan nu beeld! Ik heb de voeding en de monitor nu klaar. Eigenlijk heb je de ontvanger nodig om goed beeld te krijgen. Ik heb de boel wat voor de gek gehouden zodat het mij zonder ontvanger ook lukt. ****** And now picture! I have the power and the monitor is now ready. Actually you need the receiver to get the picture. I have the whole thing what fooled me so without receiver will succeed.
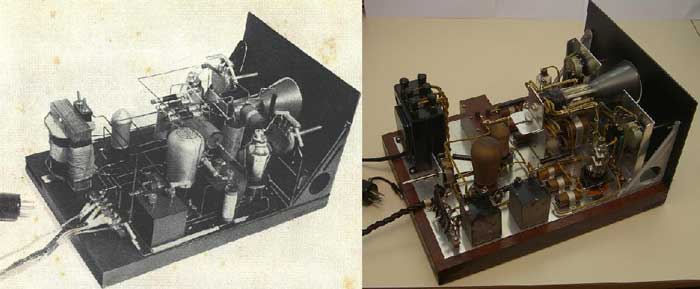
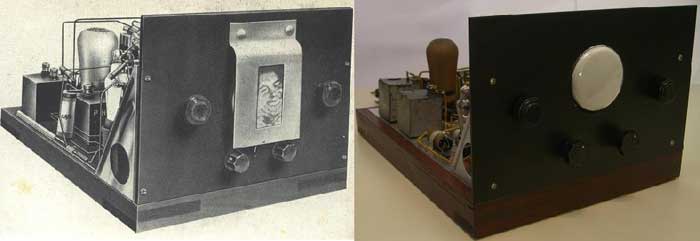
Verder vond ik het wel grappig om de foto's eens naast elkaar te zetten: ****** Furthermore, I found it funny to look at the pictures side by side:
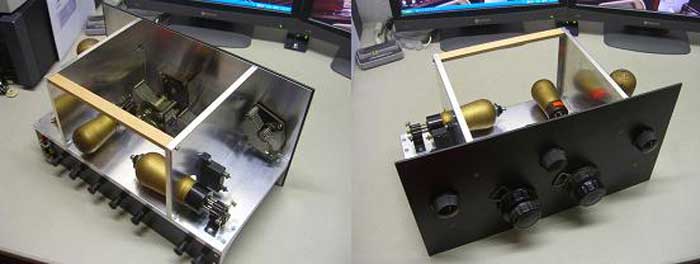
Sorry voor het lange verhaal en de spelfouten die er geheid in zullen zitten. Ik hoop dat u het met plezier heeft gelezen. En heel misschien gaat u zelf ook eens wat bouwen. Binnenkort komt ook de ontvanger aan de beurt. Ik zoek nog een paar onderdeeltjes. Nou okay dan, een kleine sneak preview: ****** Sorry for the long story and spelling mistakes that are driven into will sit. I hope you have enjoyed reading. And just maybe, you build something yourself. Soon, the receiver's turn. I am looking for a few small pieces. Well okay then, a little sneak preview:
Groeten, Roland ****** Regards, Roland
|
